Showing posts with label socks. Show all posts

Sunday, November 15, 2009

Hail, Yarnissima

The last two posts have been about sock patterns that have failed to capture my heart, but now I want to spread some love.

Yarnissima first came to my attention in a discussion on Ravelry about Cookie A's book Sock Innovation and it's exclusive cuff-down designs. Pinneguri put forth the idea that Cookie is a designer of patterns rather than architecture, contrasting her with Yarnissima, "a sock- architect, she makes socks differently, she builds them up." I made a note to check out this Yarnissima person, and I'm very happy that I did.


The pattern is called "brainless" and it highlights two very simple and very cool features that show up in Yarnissima's designs: a cable embellishment running along the sides of the foot, and a gusset triangle which is bordered by twisted stitches and emphasized with a purl background.

Isn't that cool? What a brilliant stroke of creativity to turn the gusset section into fixture of the sock design, rather than trying to hide it.

Yarnissima's designs are available from her website, and I encourage you to check them out. There are more designs that were exclusive to sock clubs, and I hope those eventually see the light of day.

Saturday, November 14, 2009

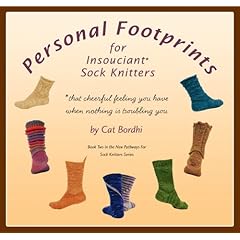
Frontiers of Sock Construction 2: Personal Footprints

I was vaguely looking forward to Cat Bordhi's latest book Personal Footprints for Insouciant Sock Knitters, but when I saw the video overview she posted on YouTube, I got obsessed. I couldn't wait for my copy to arrive from Amazon; the week the book was launched, I called every yarn shop and bookstore in town, hoping they had a copy in.

So perhaps my expectations were a little too elevated.

The Personal Footprint sock is another of those simple and genius discoveries that Bordhi has become relatively famous for: socks on 2 circs, the Moebius cast-on, and the elegant math and "No Rules" gussets of the New Pathways sock. In "Personal Footprints," Bordhi presents us with the "afterthought cuff." As I said in my last post, this is a brilliant departure from common sense -- knitting the foot of the sock as a closed tube which is then cut open to knit the ankle portion of the sock.

This innovation let's Bordhi focus on customizing the fit of the sock to the individual owner. In a nutshell here's what you do:
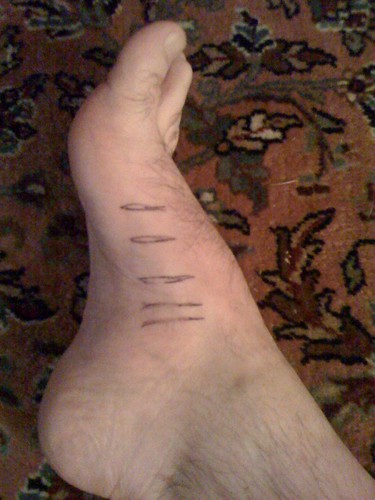
  • Cut out a tracing of the foot to serve as your guide. This is the eponymous "footprint."
  • Knit a toe-up sock, trying it on as you go and increasing as needed to fit the wearer's foot. Along the way, make notes on your footprint (toe/heel length, arch increases, ankle point, etc.)
  • After marking on your knitting where the leg will be, close off your tube by knitting a round heel.
  • Thread needles through your knitting at the cuff point, snip the yarn, unravel, and proceed with your cuff.
Intriguing sock construction philosophy, but I’m not a convert.

My biggest problem is that you have to keep trying on the sock -- over and over and over and over. Inevitably, this means you have to keep ripping back and adjusting, because until knitted fabric has about an inch extra to give the stitches some integrity, you can't reliably check the fit.

I prefer to plan ahead: know my gauge, know my targets for making the sock fit.

So I turned to science; I measured my foot and marked the intervals where the circumference is 3/4 inch bigger (6 sts in my gauge), planning my increases for those points. That alleviated the need to keep ripping when I would later discover that I needed to increase an inch or so back.

In the end, round toes and heels don’t fit my foot well, and I wasn't happy enough with my Discovery Sock to finish it and make more. Maybe over the holidays I'll get some members of my family drunk, put pen marks all over their feet, and try making Personal Footprints for them. But ultimately I don't see this ever becoming more than a novelty side trip in my sock knitting career.

The book is a good production. The instructions are clear, and Bordhi's videos supplement the book well. There's a nice assortment of specific sock patterns included, although only a couple of them really grabbed my attention. Personally, I would have been much happier if the book had dispensed with the patterns altogether, focused on the technique, included better notes to improve fit, and retailed for half the price. But I'm glad I have it, and I expect I'll return to the technique a couple times when looking for departure from the routine.

Monday, November 09, 2009

Frontiers of Sock Construction 1: The Hat Heel

In September, two new frontiers opened up in the sock knitting world: Hat Heel and Personal Footprints. I'm certain that, for two months, you've been dying to know what I think of them.

Naturally, I was intrigued by both. Creative construction has always fascinated me. Mom taught me to knit so I could make a ski band, but a simple, wide loop would not do -- I wanted something with character and shape, something that got wider and narrower as needed. And duh: no sewing allowed.

These two sock-making methods are right up my alley. "Hat Heel" starts with the heel and builds the sock outwards from unusual gusset constructions. "Personal Footprints" is a brilliant departure from common sense, instructing you to knit the foot of the sock as a closed tube which is then cut and opened to knit the cuff.

I've tried both, and my world is unchanged. Probably. There may be something to "Personal Footprints," but more on that later. First up: the Hat Heel.

The pattern is wicked clever, and it starts off fun: you knit a round cup-shape for the heel, then make long, wing-like triangles that will wrap around your foot and join at the top. That's where things began to go badly for me. I had trouble making a smooth join with so few stitches at the points of the triangles. But then the next step was a nightmare. Picking up stitches isn't usually a deal-breaker for me, but it’s not my favorite knitting activity, and this requires you to be pretty good at it, picking up all around both sides of the loop you've made. I made a dog’s breakfast out of it.

In the end, I won the battle but surrendered the campaign (the war goes on). No matter how skilled you might be at neatly picking up stitches, you're creating inflexible seams in your sock, right at the point that your foot needs the most flexibility. A lot of hard, messy work for a sock you're destined to hate wearing.

Tomorrow: Personal Footprints for Insouciant Sock Knitters.

PS: Click the picture to embiggen, and check out that gorgeous yarn. It's "Tesla" from Gaslight Dyeworks.

Sunday, August 02, 2009

Arch-Villain Pattern

Yeah, I know: there's no way you could follow the mess I posted the past couple months and make a sock. But I appreciate those of you who slogged through and made comments.

I finally took my blogorrheic ramblings and shaped them into an actual pattern. Please let me know if you discover errors, omissions, or other lapses of genius.

Friday, July 10, 2009

Arch-Villain Knit-Along: Gusset and Heel

All right, I've put this off for as long as I can. You've indulged me enough, and I thank you for your patience.

The thing is, I'm still not sure what the best heel for these socks should be. For my experiments, I've been using an Evil Genius heel, but I've been thinking that Fleegle's heel would generally work much better.

Regardless of what heel you pick, the process is the same:
  • Calculate your rounds/rows-per-inch, and multiply that by the length of your foot to get total number of rows.
  • Figure out how many rounds/rows your gusset and heel require.
  • Subtract gusset & heel rounds from the total. You now know how long to knit before starting the gusset section.
When you're ready for the gussets, stop decreasing, but keep working the increases, like this:
    Right side: Work to marker, k1, M1L, work to center top.
    Left side: work to 1 st before marker, M1R, work to center bottom.
Continue until gussets are complete and you're ready to make the heel.

Fleegle Option

For the Fleegle heel, your gussets equal 2 less than the circumference of your sock ÷ 2. For example...
  • (60 ÷ 2) - 2 = 28
  • (64 ÷ 2) - 2 = 30
  • (68 ÷ 2) - 2 = 32
  • (72 ÷ 2) - 2 = 34
My prototype sock is 68 stitches. I'm getting 12 rounds-per-inch, and at a target length of 9.5 inches, I'm shooting for 114 rows for this sock. For the Fleegle option, my gusset and heel section is 32 rounds, so my sock will be 82 rounds before beginning gusset shaping. On round 83, I'll stop decreasing and continue with my increases every other round until my sock is 100 sts in circumference. Then I knit the heel (my instructions are here in the "Turning the Heel" section).

Here's What I Did Instead.

For a 68 st sock, the Evil Genius formula calls for 12 gusset increases on each side. Since I'm increasing on alternate rounds, that's 24 rounds. The formula adds 10 short rows to turn the heel. So my gusset and heel section is 34 rows, and I should knit 80 rounds before starting the gussets.


However, on round 71, my decrease lines and increase lines bumped into each other. I meant to do that. It happened sooner than I'd hoped, but it wasn't a problem. I just started my gussets a few rounds early, and knit 8 rounds plain before turning the heel. (As kippahandcollar said, it's probably better to knit a few rounds plain after the toe before starting the arches. My lines wouldn't have bumped into each other so early).

I turned the heel on 20 stitches for the heel base. That's why I placed my decreases 10 stitches out on either side of the center bottom: so that they would slide into the increase lines, which would then line up with the heel. The experiment wasn't completely successful, but the socks aren't an utter failure.

A couple rounds plain, 6 or 7 inches of ribbing, a loose bind-off, and we're done.

What Do You Think?

Gussets on these are very different from the cuff-down versions of arch-shaped socks. Do you think the socks could be improved by placing them somewhere else? Maybe they would hug the heel better if they followed Cat Bordhi's "Riverbed" architecture, coming out from the bottom of the foot to surround the heel?

Tuesday, June 23, 2009

Slight Delay

There will be a short delay before the next Arch-Villain sock post. I apologize for the interruption. I'm participating in this month's Sock Innovation knit-along, so I'm under a deadline to finish the pair.

I like the book; lots of beautiful stitch patterns, and Cookie A's notes about design are worth reading. While the stitches are innovative, the architectures are not, and like others, I'm disappointed in the decidedly non-innovative parade of standard cuff-down constructions. But like Nancy Bush's Knitting Vintage Socks, many of these patterns can be flipped and constructed correctly toe-up. But you'll want to pay close attention to the "give" of the fabric; the designs are beautiful, but many are not very elastic, and you could discover too late that the sock won't stretch to be pulled on over the ankle and heel.

I should finish these socks in a couple days, and I'll have time to write up my notes on the gusset section of the Arch-Villain socks.

Saturday, June 13, 2009

Arch-Villain Knit-Along: Arch Shaping

As I said before, the theory of arch-shaped socks is pretty straightforward: increases on the top of the sock are paired with decreases on the bottom.

After finishing the toe, work to the center of the sole, either 1/4 or 3/4 round. Adjust magic loop (or whatever inferior tools you may be using -- I'm looking at you, Knittingbrow) so that this is the beginning of your round, and the midpoint bisects the instep. In this section, you knit the right side of your sock, then knit the left.

For the right side, you'll work some set number of stitches, make a left-leaning decrease, work to your first marker (more about this in a second), make a left-leaning increase, and work to your midpoint. On the left side, work to just before your next marker, make a right-leaning increase, work until some set number before the end of your round, make a right-leaning decrease, and work to end of round.

See? We're decreasing at fixed points so the decreases always stay on the bottom of the sock, but by making increases immediately after the first marker and immediately before the second, we push the line of increases away from the top and down toward the bottom. Here's how I do it:

Set-up
    Right side: knit to 1 st before center top, place marker, kfb in last st of right side.
    Left side: knit 1, place marker, knit to end of round.
    Knit 1 round plain.
You'll now work alternating shaping and non-shaping rounds. Shaping rounds are like this:
    Right side: k2, ssk, work to marker, k1, M1L, work to center top.
    Left side: work to 1 st before marker, M1R, work to 4 sts before center bottom, k2tog, k2.
See KnittingHelp.com for M1L & M1R instructions. Depending on how the yarn behaves, I sometimes do my usual yarnover increases with ktbl and k-twist in the next row.

Variations
  • I like the increases to begin from a midpoint, which is why I have that kfb in my set-up round. But there's nothing keeping you from starting your increases at points offset from the center.
  • Similarly, your decreases don't have to be 2 sts out from the center bottom. It might reduce some of the foot-hugging qualities of the sock, but I'm making mine 9 stitches out. I'll talk about why I picked this number when we get into the heel.
When your sock is 4 or 5 inches long, you'll want to stop to do some figuring for the gusset and heel section.

Sunday, June 07, 2009

Arch-Villain Knit-Along: Toe

I'm going to call these socks "Arch-Villains," unless someone has a better idea. That's the whole point of this exercise: putting my plans to the test, and improving them with input of others.

How This Will Work
I will lay out the instructions here, starting with a general description of what's to be done, followed by specific details of what I did and why I made those choices. Comments are open for any henchfolk working along to ask questions, offer opinions, report on progress, etc.

Step One: Make a Toe

I haven't settled on a recommended toe style for these socks yet. You're free to begin however you like. But there is something to keep in mind: in experiments so far, the fabric of this sock tends to pull the toe up the instep slightly. So the "typical" toe looks crooked, the line of increases slanting from the top front of the toes to the bottom back. One of the toes I posted about last week might work better.

I'm trying something along the lines of Cat Bordhi's "Pontoon Toe." It's similar to Queen Kahuna's "Fan Toe," with elements of FiberQat's Patch Toe. Here's how I made mine.

Turkish cast-on 10 loops, and knit one round. Instead of starting the second round, purl back across the 10 stitches you just knit on that side. (Actually, slip the first stitch and purl 9). Work back and forth on these stitches, repeating * knit 1 row, purl 1 row * 3x, slipping the first stitch of each row. Turn and knit 1 last row.

At the end of this last row of knits, pick up 4 stitches in the edge of your rectangle. The first 2 stitches will be part of your instep, the second 2 will be on the sole side. Knit across the 10 sole stitches, then pickup 4 stitches on the other side (the first 2 on the sole, the next 2 on the instep).

Bordhi and Kahuna both have you place markers to tell you where to increase. I think markers get in the way when you have so few stitches on your needles.
  1. k2, yo, k10, yo, k2; repeat for other side (16 sts total)
  2. k2, k-twist*, k10, ktbl, k2; repeat.
  3. k3, yo, k10, yo, k3; repeat.
  4. k3, k-twist, k10, ktbl, k3; repeat
  5. k4, yo, k10, yo, k4
  6. knit round, twisting the yarnovers as established
Continue in this way, increasing on either side of your 10 center stitches, until your toe is the right size. (That's 68 sts on the sock I'm making).

It took me 8 tries to come up with something half decent. Here's hoping you have better luck.


* k-twist: Slip next stitch knitwise onto the right needle, changing its mount. Slip the stitch back to the left needle purlwise; the front leg of the stitch now lies in back of the needle while the back leg of the stitch comes down the front of the needle. Knit the back leg like it's a normal stitch, which further twists it to the right.

Saturday, June 06, 2009

Arch-Shaped Socks

Are arch-shaped socks the Next Big Thing in sock knitting? QueerJoe just finished a pair. I've been fascinated with them since knitting my "Francie" socks last year. There's a class at Sock Summit that I thought about taking, but with so many other Sock Summit choices, I decided I could skip the class and buy some patterns.

All the patterns I've seen are cuff-down, and the theory is pretty straightforward: shape the fabric around the foot by increasing at fixed points on the bottom of the sock while simultaneously working decreases that travel up the sides and meet at the top. Flipping this around to to create a toe-up version is easy -- just work decreases at fixed points on the bottom, and increases that start at the top and travel down the sides.

I've been working on more detailed instructions in my lab, and while the work isn't finished, I think it may be at a point that I can start sharing it with my henchmen. Anyone up for a knit-along? If so, grab some sock yarn and needles, and we'll get started in a couple days.

Sunday, May 31, 2009

Antepenultimate Toe

Recent experiments in the Evil Genius lab have caused me to contemplate sock toes. My "Go To" toe remains the Just Start Knitting toe, but it's less than ideal in some situations.

I recently encountered the Knitting Swede's Rounded Toe. This is a great method; because the increases aren't stacked on top of one another, it eliminates the visible band, producing a smoother fabric. Because the increase rate is faster than usual -- 8 increases in 3 rounds instead of 4 -- the resulting toe is shorter than most. If you have short toes, you might prefer that.

I wanted something a little longer, so borrowing the Knitting Swede's method of offsetting the increases, I started working from an earlier experiment that produces a toe-up version of the Francie sock. This is the result:


While working on this, I knew it wouldn't be the "Ultimate Toe." I was thinking of it as the "Penultimate Toe," but I still think it falls somewhat short of the mark. Here, then, are the instructions for the...

ANTEPENULTIMATE SOCK TOE

Turkish Cast-on 8. Knit 1.5 rounds (16 sts total).

Begin toe increases:
  1. k1, yo, k6, yo, k1; repeat for top of sock (20 sts total)
  2. k1, ktbl, k1, yo, k4, yo, k1, k-twist*, k1; repeat (24 sts total)
  3. k1, yo, k2, ktbl, k4, k-twist, k2, yo, k1; repeat (28 sts total)
  4. k1, ktbl, k1, yo, k8, yo, k1, k-twist, k1; repeat (32 sts total)
  5. k3, ktbl, k8, k-twist, k3; repeat (32 sts total)
Begin alternate increase rows.
  1. k1, yo, k14, yo, k1; repeat for top of sock (36 sts)
  2. [and all even rounds] knit, twisting the yarnovers as established
  3. k3, yo, k12, yo, k3; repeat (40 sts)
  4. k5, yo, k10, yo, k5; repeat (44 sts)
  5. k7. yo, k8, yo, k7; repeat (48 sts)
  6. k9, yo, k6, yo, k9; repeat (52 sts)
  7. k11, yo, k4, yo, k11; repeat (56 sts)
  8. k13, yo, k2, yo, k13; repeat (60 sts)
I wasn't quite up to my desired circumference at this point, so I continued adding increases to the sides of the sock, as the Knitting Swede does.
  1. k1, yo, k28, yo, k1 (64 sts)
  2. k3, yo, k26, yo, k3 (68 sts)


* k-twist: Slip next stitch knitwise onto the right needle, changing its mount. Slip the stitch back to the left needle purlwise; the front leg of the stitch now lies in back of the needle while the back leg of the stitch comes down the front of the needle. Knit the back leg like it's a normal stitch, which further twists it to the right.

Sunday, May 03, 2009

Sock Genius Fail

If I don't shape up, I'm going to be forced to relinquish my claim as the Evil Sock Genius. I keep knitting beautiful socks that don't fit human feet.

EXHIBIT A: These socks were to be a Mother's Day present. I called them "Enelram," a toe-up adaptation of Cookie A's Marlene socks. They seemed fantastic until I finished the first one and discovered that it was an inch too long in the foot -- or would be, if you could pull the tight thing on in the first place.


EXHIBIT B: Figuring the problem was with my heel strategy, I decided to suck it up and follow the pattern. It made no difference. Only with much tugging and swearing could these socks be pulled on.

The problem, of course, is gauge. The pattern clearly specifies 24 stitches to 4 inches. (I would argue, however, that "6 stitches per inch" is more clear). I didn't notice that these socks need thicker yarn and bigger needles than usual. In my defense, a 68-72 stitch circumference normally indicates the yarn and needles I was using.

EXHIBITS C-F: These are prototypes for a pattern I'm working on (more about this later). I have ripped back and reknit the heels repeatedly, trying 4 different heel strategies. During this process, I had to admit that my numbers for the Evil Genius Sock are just wrong. Maybe they work on a plain stockinette sock, but like Exhibit A above, with a patterned instep they produce a sock that is both too long and too tight across the arch and heel. The 4th attempt finally produced something acceptable, but even that falls short of perfect.

The Evil Sock Genius pattern will have to undergo some serious revision. But first, I need to figure out what I'm going to do for Mother's Day.

Sunday, February 15, 2009

Evil Genius Heel Replacement

As I mentioned, my aunt had worn through the heel bottom of her favorite pair of socks. I got inspired yesterday to try fixing them: although the original socks were knit cuff-down, I figured I could fix them using the heel turn method from my toe-up Evil Genius Socks.

I ran a circular needle through the stitches along one side of the heel flap, across the bottom, then up the other side of the flap. I purled back across those stitches with my replacement yarn, and then followed the Evil Genius Lessons to turn a new heel and work a new flap.

I had to modify the instructions slightly, since I couldn't work the complete sock round to pick up up my wraps (I just left the wraps in place). I grafted the top of the new flap to the bottom of the old cuff, then cut and unraveled the old heel.

It's not perfect. Obviously, the pretty, pale blue sock now has a drab, gray flap stuck on the back of it. (Still, it coordinates better than all the other options I considered at the yarn shop). I'm sure it won't be as comfortable as before.

Both socks began to unravel in unexpected places once I was finished, so I had to do some emergency suturing to keep things together. I expect that there are other areas where the old yarn will work loose from the new heel.

Still, it was worth a try. I'm really rather proud to have figured this out, and amazed that it worked as well as it did. It's probably not permanent (and I hope my family doesn't expect me to make a habit of such repair jobs), but I think it will squeeze a little more life out of these socks.

Saturday, February 07, 2009

On the popularity of knitted fandom

I may be knitting the most gorgeous pair of socks I've ever made.


They're for my aunt. Her favorite pair of socks developed a nasty hole in one heel. So I thought I'd knit her a new pair of lacy socks, and experiment with a heel flap on the bottom to see if she liked that. The instep lace pattern is a design from the now defunct Socktopia.net. It's called Kaylee, after the character on Firefly/Serenity because the central lace motif looks a bit like fireflies.

The designer created many sock patterns inspired by and named after characters with fan-followings (Firefly, Harry Potter, etc.). I can see how that it is an attention grabber -- last month, Wash's Sweater had 15,446 page views. I've gotten email inquiries about finding a knitter-for-hire to make one, and about including the pattern in a proposed book of Whedon-inspired knitting designs.

It got me thinking: what if I miniaturized the big cable from the Wash Sweater to make it sock sized? People might actually buy it!

Early experiments have been mixed. At left, you see a sample of the latest plan, which uses a single line of traveling slipped stitches to sketch out the cable motif. It's not bad, but the fabric it creates seems a little stiff. The advantage is that it requires no purling. I want to try some experiments with traveling twisted stitches over a purl background, and see if that makes something people are more likely to want to wear.

Friday, November 14, 2008

Sock Updates

No posts since Halloween? Clearly, I'm too lazy and boring to sustain a blog.

Here's the current sock in progress:


Standard fare, following my own Lesser Evil sock instructions and adding a simple but elegant twist on the usual cuff ribbing.

After finishing my Francie socks, I hunkered down for a bit in my secret lab to figure out how to clone that pattern from the toe-up. Turns out that it's not too hard:

But that experiment lies abandoned because, while the Francie sock looks cool, the truth is you can feel the ridges on the soles of your feet, which I know will drive most of my loved ones crazy. I even suspect that in this particular yarn I'm using, the socks will quickly leave blisters. I'm evil because my sock genius will overpower you, not because I actually want to inflict physical, sock-based harm.

Sunday, October 12, 2008

One Down, One Up

This summer, I joined my first sock yarn club. For those who are unfamiliar with the concept: you pay a yarn company some set price up front, and for a certain span of time at regular intervals they will send you yarn and a pattern. The Unique Sheep company created such a club, the "Ram Club," specifically for men's socks; the skeins are bigger than most so there will be enough for men's larger feet, and the colorways are designed more-or-less for men's tastes.

I've really liked the first two shipments of yarn. The first contained two different, thin yarns with instructions to hold them together. The pattern was a toe-up design, but I only followed a portion of it -- the gusset and heel construction, using my own preferred toe method. I also didn't follow the stitch pattern, recognizing that these yarns would look good in a garter rib pattern.


I was initially disappointed in the second shipment because the color was so similar to the first. But I quickly fell in love with the texture of the tightly spun, sport weight merino in the second sock. Again, I glanced at and abandoned the accompanying pattern, deciding to try a popular sock pattern called Francie. I had tried Francie before, but I disliked both the yarn I used and the ribbing pattern on the cuff, so I abandoned it. Plus, Francie is made top down, and by now you know how I feel about that.

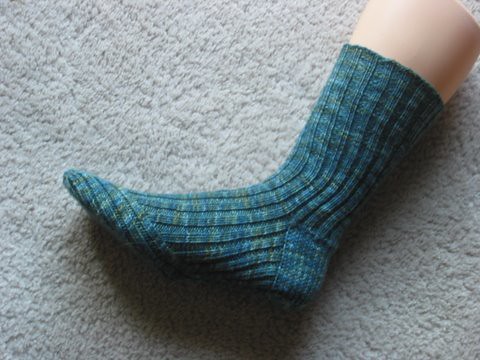
Still, in the Ram Club yarn with a more sedate and reliable 2x2 ribbing, a churned out a sock that I like very much.

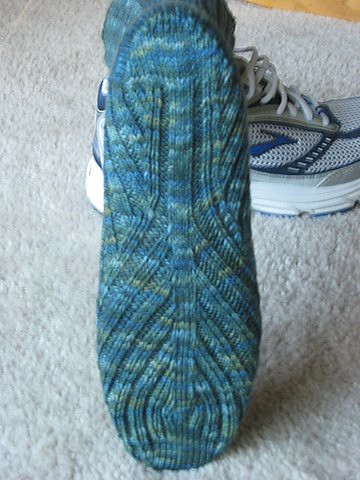
Here's a shot of the bottom of the sock, which give you an idea how the ribbing flows around the foot.

I'm pretty happy with this, but I know it could be a better sock if it were constructed toe-up. I decided to try knitting the second sock backwards, seeing if I can make an identical sock with the stitches running the opposite way.

Friday, June 20, 2008

Blimey

Why do I keep forgetting that one skein of Glacier is not enough to knit a pair of men's socks?


Oh well. It's my last skein of the stuff. I won't have this particular problem again.

I made these using the heel method from Fleegle's pattern. I love this heel. It's beautiful and it's easy. I want to experiment to see if the fit is ruined by making the heel base a tad wider -- it's a little too pointy for my taste, but that's a minor quibble.

Wednesday, June 18, 2008

Not professional

Got very helpful response from XRX. They understand that it's a fuzzy definition and people can be confused. And they drew what is, in my opinion, a very clear and reasonable line:
A simple rule (that we think is fair) is that if you haven’t made more than $500 (a prize amount for aspecific amateur category in the Think Outside The SOX contest) then you are still an amateur. If you teach the occasional class here and there, you may or may not be considered an amateur – but that would really depend on how much you teach and how much money you've made from teaching. In most cases, we find that knitting and crochet instructors – paid to teach others – really are professionals; at least in the eyes of their students. Again… we try to use the $500 rule here as well.
I haven't made anywhere near $500. So I'm free to enter as an amateur.

Soon you will all tremble before the awesome spectacle of my evil sock designs.

Saturday, May 31, 2008

Andersson Heel

I have revised and moved my bibliography of toe-up sock construction methods, adding some patterns I've run across in the past year. As I was adding the Andersson Heel, I realized that because the instructions are so brief, I need to do some complicated figuring in order to adapt it when I make socks. I would find it easier to work from a chart, and so with Knitman's permission, I offer my version. (BTW: Knitman gave his permission, but not his endorsement. He was unable to make sense of my directions. It's very possible that I've got it wrong. So do check out his instructions here and here.)

Toe-Up Socks using the Andersson Heel

Start the socks using your favorite toe-up starting method, such as my Tornado Toe. Make your toe and begin knitting the foot.

After a few inches, count how many rows (or rounds) work out to an inch. Multiply that by two inches less the length of the foot this sock is meant to fit. Example, if your foot is 9 inches long, then you want 7 inches, and if you're getting 11 rounds per inch, then we're talking 77 rounds. Got it?

Now find your sock's stitch circumference on the chart below (column A). Subtract the number of designated gusset rounds from your total number of rounds (column C is a standard gusset; column D is for a longer, more tapered gusset). You now know how many rounds to knit before starting the gussets.


Sock Circumference (A) Gusset Stitches (B) Standard Gusset - increase alternate rounds (C) Longer Gusset - increase every 3rd round (D)
28 6 12 18
32 6 12 18
36 7 14 21
40 8 16 24
44 8 16 24
48 9 18 27
52 10 20 30
56 10 20 30
60 11 22 33
64 12 24 36
68 12 24 36
72 13 26 38
76 14 28 42
80 14 28 42

Back to the example: if your sock is 60 stitches in circumference, your target is 77 rounds, and you want the longer, more tapered gusset, you would subtract 33 from 77: you'll knit 44 rounds from your cast-on point before starting the gussets.

Decide which side of your sock is the sole and which is the instep or top. When you reach the round where your gussets begin, increase on either side of sole: knit 1, make 1, knit across sole until 1 stitch remains, make 1, knit 1.

Knit one or two plain rounds after the increase round, depending on whether you chose the standard or longer gusset numbers from the chart.

Repeat increase and plain rounds until you have added on each side of the sole the number of gusset stitches designated for your circumference (column B in the chart).

The Heel

Knit across the sole, stopping B+1 stitches before the end. (If you added 11 gusset stitches to each side of the sole, you will knit across the sole until 12 stitches remain). SSK, and turn.

Sl1, then purl across sole until B+1 stitches remain. P2tog. Turn.

Sl1, then knit until 1 stitch before the gap. SSK. Turn.

Sl1, then purl until 1 stitch before the gap. P2tog. Turn.

Repeat these last two rows until 2 stitches remain beyond the gap. After the SSK that leaves one stitch, do not turn. Resume knitting in the round, across the instep. When you return to the sole (now "back of heel") side, K1, K2tog, and resume knitting plain.

Knit the leg using whatever ribbing or pattern you choose, and bind-off loosely at the top.

Saturday, May 10, 2008

Evil takes new direction

Big thanks to the underlings who voted in my poll.
  • 8% said it was better for smaller socks to be looser, relative to bigger socks
  • 16% said the opposite was true, and smaller socks should be relatively tighter.
  • 76% picked the obviously correct answer, which is that "tightness" is a variable that doesn't correlate with size.
But while you were distracted with these trivialities, I have put my genius to work and discovered new resources of sock-based evil.

The question, minions, is not how much bigger must you make a sock to accommodate the heel. Imagine that you begin with the knowledge of the circumference of heel and instep, and from there calculate how much smaller the sock should be to fit the foot and toes?

Muwah-ha-ha-ha-ha-haaa!

Thursday, May 01, 2008

Design opinions needed

The Evil Sock Genius pattern is nearly complete. (They all laughed at me, but soon...soon...I will have my revenge).

I need one more element before I begin to unleash my weapon on an unsuspecting world: the world's opinion. So I've put a poll up on the blog -------------------------------->

It's really all about stitch circumference. Do you think it's better for socks with a smaller stitch circumference to be a bit looser or a bit tighter, relative to socks with a larger stitch circumference?

My general rule is that all socks should err on the side of "tighter." But see, I'm building a reference chart that is the base of my pattern, and the references I'm consulting -- while they agree on the fit of socks in the mid-range (48 - 60 stitches around), one reference makes socks with less than 48 stitches slightly looser, and one makes it slightly tighter.

Which do you think is best? Take my poll. (And seal your doom).