Saturday, March 13, 2010

I Used to Be a Folklorist

Progress cleaning the basement has been slow. I bought 5 cheap bookcases, and while I was setting them up, I discovered that mildew had flourished beneath a stack of board games. That took me a while to clean up, but the smell and stains are gone.

The biggest purge I've made so far is my folklore stuff. I took my books to the Friends of the Library, keeping only my heavily annotated copy of More Man Than You'll Ever Be. I looked through all of my graduate school notebooks and tossed everything except papers and journals. And then there was this box:

This box was what was left from previous grad school purges.

It contained the course packets I made my students buy for the composition and the folklore classes I taught. There were some of the articles that I'd copied for my general exams and my dissertation research, and the floppy disks with my data. It even had the tape recorder and cassettes I used for my Masters thesis and for my very first fieldwork project: an interview with my office mate Tom Burns (now director of the Perkins Observatory), who told me the story of the Denney Hall Elevator Ghost.
A professor was in his office on the 5th floor of Denney Hall one night, waiting for a student who never showed up for her appointment. He walked down to the 4th floor for a cup of coffee before going home, and just as he pushed the down button for the elevator, he heard screams from the floor above. When the elevator arrived, he pushed the button for the first floor and left the building. The next day, the body of his student was discovered in front of the professor's office. The professor was wracked with remorse, retired immediately, and died a few months later, a broken man. But ever since, when you're on the 4th floor of Denney Hall and you summon the elevator, the elevator always goes up to the 5th floor before opening on the 4th.
Tom is a great story teller, and his version was much better than mine, with an actual appearance of the ghost in the elevator to tell his own story to a grad student.

It wasn't as hard to toss all this as I thought it might be. For all of grad school, I was Mr. Folklore (or "Captain Folklore," I told people, "like a superhero, with a cape and tights.") It was harder getting over the lingering sense of failure after I'd abandoned my dissertation and my academic career. But I'm happy where I've ended up, and I don't feel much guilt and shame over that "road not taken." (Besides, occasionally Rose asks me a question about folklore and the Internet, and I get to feel smart, and convince myself that I could have succeeded on the tenure track, I just chose not to).

Sunday, February 21, 2010

CleanQuest 2010: Return to the Basement

Two years ago, I took a week of vacation to do some serious cleaning in the house, a practice I mean to repeat annually as long as it doesn't do permanent damage to Mike's love for me. But this year's cleaning sabbatical was preempted by my mom's knee replacement surgery: I needed to spend that week helping to keep her spirits up and doing what I could to speed her recovery.

I thought there would be no cleaning this year, as things are too busy at work to take off much more time right now. But then Wednesday night, we heard a scary sound of electricity arcing and a loud "zap." The circuit that carries our dishwasher and refrigerator had fried. I began to realize that things were about to get very bad in our basement.

Access to the circuit box was impeded by a large shelving structure made up of long boards held up by two ladders (something like this, but less neat). I knew I needed to get it out of the way so workers could fix the circuit. With the ladders down, this is what our basement looks like.


Please don't put us on Hoarders.

I'm going to make it better, and this blog will help. I'm not a compulsive hoarder; I keep things because they mean something to me, remind me of pieces of my life and identity that I can't bear to toss away and forget. I think my best strategy for getting the basement under control is to blog about the things I find. If I take a picture and tell the story, the enchantments that tie these things to my life will be lifted. Rather than throwing away pieces of myself, I will celebrate and preserve them here...before tossing them in the dumpster.

It will be solipsistic, I'm sure, but you know, the blog is called "A Glimpse at Don." I think I'll enjoy it. Hopefully you won't find it intolerable.

Sunday, January 24, 2010

The Dark Side

I'm learning to spin. It's WonderMike's fault. He just looked so cool, so happy, standing there at Sock Summit, roving draped around his neck, making beautiful yarn. It wasn't a chore; it was an enjoyable pasttime, something to do with his hands while he chatted and laughed with passers-by.

I've actively resisted spinning. Yes, the spindles were pretty. Yes, the handspun was beautiful. But no, I didn't need to do it myself. I am perfectly happy letting others raise the sheep, sheer the wool, clean it, dye it, spin it. I like being further up this food chain: buying the yarn and knitting it into something nice.

But stupid WonderMike had to open the door, and Abby Franquemont slipped in, with her engaging and witty Ravelry persona and her terrific Intro to Spinning video on YouTube. Her simple explanation -- spinning is just pulling apart fiber and twisting it so it holds together; use a stick to hold the yarn and make things go faster -- was irresistible to me. And her book! Oh my god, her book. I love a funny, smart woman talking to me about the physics of yarn. And she blew my mind by pointing out that spindles are responsible for nearly all human textile production up until about 400 years ago.

So a week ago, I took a class.

I'm not very good, but I don't expect to be. Abby (and others) argue that learning to spin involves developing muscle memory, and that if I keep practicing a little each day, I'll get it in about a month or two.

The result so far:


That's what became of the roving I got in class. Now I'm getting serious with some dyed combed top that I bought at a local store.


So I'll give it a couple months, working at it every day. If it doesn't click by spring, I'll drop it. And if it does click, I'll probably still drop it: I like to knit things, not make yarn. I'm not interested in owning a wheel. (If I'm buying equipment, I'd rather it was a circular sock machine).

But meanwhile, I think I'm learning a lot about yarn. And I've got an excuse now to look at the spindles at the wool festivals.

Sunday, December 06, 2009

Mishap

Just finished knitting up the front and joining those front panels to the back on this sweater.

It wasn't until I put the photo on my computer and rotated it 90° that I noticed the problem. It's rather more visible in the photo than it is in real life, but yeah, it's definitely there.

What do you think? Live with it? Or unpick the shoulder seam and rip back?

Sunday, November 15, 2009

Hail, Yarnissima

The last two posts have been about sock patterns that have failed to capture my heart, but now I want to spread some love.

Yarnissima first came to my attention in a discussion on Ravelry about Cookie A's book Sock Innovation and it's exclusive cuff-down designs. Pinneguri put forth the idea that Cookie is a designer of patterns rather than architecture, contrasting her with Yarnissima, "a sock- architect, she makes socks differently, she builds them up." I made a note to check out this Yarnissima person, and I'm very happy that I did.


The pattern is called "brainless" and it highlights two very simple and very cool features that show up in Yarnissima's designs: a cable embellishment running along the sides of the foot, and a gusset triangle which is bordered by twisted stitches and emphasized with a purl background.

Isn't that cool? What a brilliant stroke of creativity to turn the gusset section into fixture of the sock design, rather than trying to hide it.

Yarnissima's designs are available from her website, and I encourage you to check them out. There are more designs that were exclusive to sock clubs, and I hope those eventually see the light of day.

Saturday, November 14, 2009

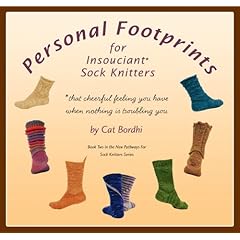
Frontiers of Sock Construction 2: Personal Footprints

I was vaguely looking forward to Cat Bordhi's latest book Personal Footprints for Insouciant Sock Knitters, but when I saw the video overview she posted on YouTube, I got obsessed. I couldn't wait for my copy to arrive from Amazon; the week the book was launched, I called every yarn shop and bookstore in town, hoping they had a copy in.

So perhaps my expectations were a little too elevated.

The Personal Footprint sock is another of those simple and genius discoveries that Bordhi has become relatively famous for: socks on 2 circs, the Moebius cast-on, and the elegant math and "No Rules" gussets of the New Pathways sock. In "Personal Footprints," Bordhi presents us with the "afterthought cuff." As I said in my last post, this is a brilliant departure from common sense -- knitting the foot of the sock as a closed tube which is then cut open to knit the ankle portion of the sock.

This innovation let's Bordhi focus on customizing the fit of the sock to the individual owner. In a nutshell here's what you do:
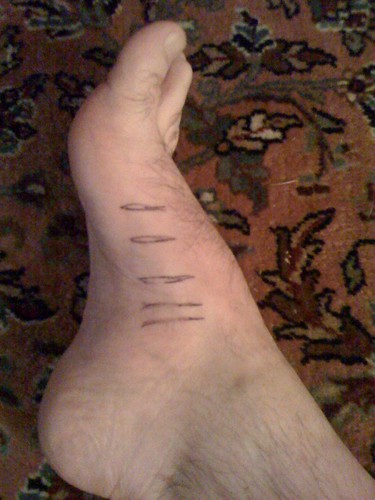
  • Cut out a tracing of the foot to serve as your guide. This is the eponymous "footprint."
  • Knit a toe-up sock, trying it on as you go and increasing as needed to fit the wearer's foot. Along the way, make notes on your footprint (toe/heel length, arch increases, ankle point, etc.)
  • After marking on your knitting where the leg will be, close off your tube by knitting a round heel.
  • Thread needles through your knitting at the cuff point, snip the yarn, unravel, and proceed with your cuff.
Intriguing sock construction philosophy, but I’m not a convert.

My biggest problem is that you have to keep trying on the sock -- over and over and over and over. Inevitably, this means you have to keep ripping back and adjusting, because until knitted fabric has about an inch extra to give the stitches some integrity, you can't reliably check the fit.

I prefer to plan ahead: know my gauge, know my targets for making the sock fit.

So I turned to science; I measured my foot and marked the intervals where the circumference is 3/4 inch bigger (6 sts in my gauge), planning my increases for those points. That alleviated the need to keep ripping when I would later discover that I needed to increase an inch or so back.

In the end, round toes and heels don’t fit my foot well, and I wasn't happy enough with my Discovery Sock to finish it and make more. Maybe over the holidays I'll get some members of my family drunk, put pen marks all over their feet, and try making Personal Footprints for them. But ultimately I don't see this ever becoming more than a novelty side trip in my sock knitting career.

The book is a good production. The instructions are clear, and Bordhi's videos supplement the book well. There's a nice assortment of specific sock patterns included, although only a couple of them really grabbed my attention. Personally, I would have been much happier if the book had dispensed with the patterns altogether, focused on the technique, included better notes to improve fit, and retailed for half the price. But I'm glad I have it, and I expect I'll return to the technique a couple times when looking for departure from the routine.

Monday, November 09, 2009

Frontiers of Sock Construction 1: The Hat Heel

In September, two new frontiers opened up in the sock knitting world: Hat Heel and Personal Footprints. I'm certain that, for two months, you've been dying to know what I think of them.

Naturally, I was intrigued by both. Creative construction has always fascinated me. Mom taught me to knit so I could make a ski band, but a simple, wide loop would not do -- I wanted something with character and shape, something that got wider and narrower as needed. And duh: no sewing allowed.

These two sock-making methods are right up my alley. "Hat Heel" starts with the heel and builds the sock outwards from unusual gusset constructions. "Personal Footprints" is a brilliant departure from common sense, instructing you to knit the foot of the sock as a closed tube which is then cut and opened to knit the cuff.

I've tried both, and my world is unchanged. Probably. There may be something to "Personal Footprints," but more on that later. First up: the Hat Heel.

The pattern is wicked clever, and it starts off fun: you knit a round cup-shape for the heel, then make long, wing-like triangles that will wrap around your foot and join at the top. That's where things began to go badly for me. I had trouble making a smooth join with so few stitches at the points of the triangles. But then the next step was a nightmare. Picking up stitches isn't usually a deal-breaker for me, but it’s not my favorite knitting activity, and this requires you to be pretty good at it, picking up all around both sides of the loop you've made. I made a dog’s breakfast out of it.

In the end, I won the battle but surrendered the campaign (the war goes on). No matter how skilled you might be at neatly picking up stitches, you're creating inflexible seams in your sock, right at the point that your foot needs the most flexibility. A lot of hard, messy work for a sock you're destined to hate wearing.

Tomorrow: Personal Footprints for Insouciant Sock Knitters.

PS: Click the picture to embiggen, and check out that gorgeous yarn. It's "Tesla" from Gaslight Dyeworks.

Sunday, November 08, 2009

We interrupt this hiatus with a post

So, yeah, I haven't posted anything in 3 months. I can't even say that there's been nothing to write about: in socks alone there was Sock Summit, a funky new sock-construction method on Knitty, my new-found adoration for Yarnissima, a big "Ah Ha" moment I had about my Evil Genius numbers, and a new Cat Bordhi book. I'm doing another Stopwatch Sock project to test how long it takes me to knit a pair, and I think I'm rekindling my love for the PGR short-row heel. Plus, I've knit a shawl, I'm thinking about knitting another one, and I've got a sweater project going.

I haven't written about any of this because I'm lazy. So maybe this is a sign that you'll be hearing more from me here. Or maybe it's not.

Sunday, August 02, 2009

Arch-Villain Pattern

Yeah, I know: there's no way you could follow the mess I posted the past couple months and make a sock. But I appreciate those of you who slogged through and made comments.

I finally took my blogorrheic ramblings and shaped them into an actual pattern. Please let me know if you discover errors, omissions, or other lapses of genius.

Friday, July 10, 2009

Arch-Villain Knit-Along: Gusset and Heel

All right, I've put this off for as long as I can. You've indulged me enough, and I thank you for your patience.

The thing is, I'm still not sure what the best heel for these socks should be. For my experiments, I've been using an Evil Genius heel, but I've been thinking that Fleegle's heel would generally work much better.

Regardless of what heel you pick, the process is the same:
  • Calculate your rounds/rows-per-inch, and multiply that by the length of your foot to get total number of rows.
  • Figure out how many rounds/rows your gusset and heel require.
  • Subtract gusset & heel rounds from the total. You now know how long to knit before starting the gusset section.
When you're ready for the gussets, stop decreasing, but keep working the increases, like this:
    Right side: Work to marker, k1, M1L, work to center top.
    Left side: work to 1 st before marker, M1R, work to center bottom.
Continue until gussets are complete and you're ready to make the heel.

Fleegle Option

For the Fleegle heel, your gussets equal 2 less than the circumference of your sock ÷ 2. For example...
  • (60 ÷ 2) - 2 = 28
  • (64 ÷ 2) - 2 = 30
  • (68 ÷ 2) - 2 = 32
  • (72 ÷ 2) - 2 = 34
My prototype sock is 68 stitches. I'm getting 12 rounds-per-inch, and at a target length of 9.5 inches, I'm shooting for 114 rows for this sock. For the Fleegle option, my gusset and heel section is 32 rounds, so my sock will be 82 rounds before beginning gusset shaping. On round 83, I'll stop decreasing and continue with my increases every other round until my sock is 100 sts in circumference. Then I knit the heel (my instructions are here in the "Turning the Heel" section).

Here's What I Did Instead.

For a 68 st sock, the Evil Genius formula calls for 12 gusset increases on each side. Since I'm increasing on alternate rounds, that's 24 rounds. The formula adds 10 short rows to turn the heel. So my gusset and heel section is 34 rows, and I should knit 80 rounds before starting the gussets.


However, on round 71, my decrease lines and increase lines bumped into each other. I meant to do that. It happened sooner than I'd hoped, but it wasn't a problem. I just started my gussets a few rounds early, and knit 8 rounds plain before turning the heel. (As kippahandcollar said, it's probably better to knit a few rounds plain after the toe before starting the arches. My lines wouldn't have bumped into each other so early).

I turned the heel on 20 stitches for the heel base. That's why I placed my decreases 10 stitches out on either side of the center bottom: so that they would slide into the increase lines, which would then line up with the heel. The experiment wasn't completely successful, but the socks aren't an utter failure.

A couple rounds plain, 6 or 7 inches of ribbing, a loose bind-off, and we're done.

What Do You Think?

Gussets on these are very different from the cuff-down versions of arch-shaped socks. Do you think the socks could be improved by placing them somewhere else? Maybe they would hug the heel better if they followed Cat Bordhi's "Riverbed" architecture, coming out from the bottom of the foot to surround the heel?

Tuesday, June 23, 2009

Slight Delay

There will be a short delay before the next Arch-Villain sock post. I apologize for the interruption. I'm participating in this month's Sock Innovation knit-along, so I'm under a deadline to finish the pair.

I like the book; lots of beautiful stitch patterns, and Cookie A's notes about design are worth reading. While the stitches are innovative, the architectures are not, and like others, I'm disappointed in the decidedly non-innovative parade of standard cuff-down constructions. But like Nancy Bush's Knitting Vintage Socks, many of these patterns can be flipped and constructed correctly toe-up. But you'll want to pay close attention to the "give" of the fabric; the designs are beautiful, but many are not very elastic, and you could discover too late that the sock won't stretch to be pulled on over the ankle and heel.

I should finish these socks in a couple days, and I'll have time to write up my notes on the gusset section of the Arch-Villain socks.

Saturday, June 13, 2009

Arch-Villain Knit-Along: Arch Shaping

As I said before, the theory of arch-shaped socks is pretty straightforward: increases on the top of the sock are paired with decreases on the bottom.

After finishing the toe, work to the center of the sole, either 1/4 or 3/4 round. Adjust magic loop (or whatever inferior tools you may be using -- I'm looking at you, Knittingbrow) so that this is the beginning of your round, and the midpoint bisects the instep. In this section, you knit the right side of your sock, then knit the left.

For the right side, you'll work some set number of stitches, make a left-leaning decrease, work to your first marker (more about this in a second), make a left-leaning increase, and work to your midpoint. On the left side, work to just before your next marker, make a right-leaning increase, work until some set number before the end of your round, make a right-leaning decrease, and work to end of round.

See? We're decreasing at fixed points so the decreases always stay on the bottom of the sock, but by making increases immediately after the first marker and immediately before the second, we push the line of increases away from the top and down toward the bottom. Here's how I do it:

Set-up
    Right side: knit to 1 st before center top, place marker, kfb in last st of right side.
    Left side: knit 1, place marker, knit to end of round.
    Knit 1 round plain.
You'll now work alternating shaping and non-shaping rounds. Shaping rounds are like this:
    Right side: k2, ssk, work to marker, k1, M1L, work to center top.
    Left side: work to 1 st before marker, M1R, work to 4 sts before center bottom, k2tog, k2.
See KnittingHelp.com for M1L & M1R instructions. Depending on how the yarn behaves, I sometimes do my usual yarnover increases with ktbl and k-twist in the next row.

Variations
  • I like the increases to begin from a midpoint, which is why I have that kfb in my set-up round. But there's nothing keeping you from starting your increases at points offset from the center.
  • Similarly, your decreases don't have to be 2 sts out from the center bottom. It might reduce some of the foot-hugging qualities of the sock, but I'm making mine 9 stitches out. I'll talk about why I picked this number when we get into the heel.
When your sock is 4 or 5 inches long, you'll want to stop to do some figuring for the gusset and heel section.

Sunday, June 07, 2009

Arch-Villain Knit-Along: Toe

I'm going to call these socks "Arch-Villains," unless someone has a better idea. That's the whole point of this exercise: putting my plans to the test, and improving them with input of others.

How This Will Work
I will lay out the instructions here, starting with a general description of what's to be done, followed by specific details of what I did and why I made those choices. Comments are open for any henchfolk working along to ask questions, offer opinions, report on progress, etc.

Step One: Make a Toe

I haven't settled on a recommended toe style for these socks yet. You're free to begin however you like. But there is something to keep in mind: in experiments so far, the fabric of this sock tends to pull the toe up the instep slightly. So the "typical" toe looks crooked, the line of increases slanting from the top front of the toes to the bottom back. One of the toes I posted about last week might work better.

I'm trying something along the lines of Cat Bordhi's "Pontoon Toe." It's similar to Queen Kahuna's "Fan Toe," with elements of FiberQat's Patch Toe. Here's how I made mine.

Turkish cast-on 10 loops, and knit one round. Instead of starting the second round, purl back across the 10 stitches you just knit on that side. (Actually, slip the first stitch and purl 9). Work back and forth on these stitches, repeating * knit 1 row, purl 1 row * 3x, slipping the first stitch of each row. Turn and knit 1 last row.

At the end of this last row of knits, pick up 4 stitches in the edge of your rectangle. The first 2 stitches will be part of your instep, the second 2 will be on the sole side. Knit across the 10 sole stitches, then pickup 4 stitches on the other side (the first 2 on the sole, the next 2 on the instep).

Bordhi and Kahuna both have you place markers to tell you where to increase. I think markers get in the way when you have so few stitches on your needles.
  1. k2, yo, k10, yo, k2; repeat for other side (16 sts total)
  2. k2, k-twist*, k10, ktbl, k2; repeat.
  3. k3, yo, k10, yo, k3; repeat.
  4. k3, k-twist, k10, ktbl, k3; repeat
  5. k4, yo, k10, yo, k4
  6. knit round, twisting the yarnovers as established
Continue in this way, increasing on either side of your 10 center stitches, until your toe is the right size. (That's 68 sts on the sock I'm making).

It took me 8 tries to come up with something half decent. Here's hoping you have better luck.


* k-twist: Slip next stitch knitwise onto the right needle, changing its mount. Slip the stitch back to the left needle purlwise; the front leg of the stitch now lies in back of the needle while the back leg of the stitch comes down the front of the needle. Knit the back leg like it's a normal stitch, which further twists it to the right.

Saturday, June 06, 2009

Arch-Shaped Socks

Are arch-shaped socks the Next Big Thing in sock knitting? QueerJoe just finished a pair. I've been fascinated with them since knitting my "Francie" socks last year. There's a class at Sock Summit that I thought about taking, but with so many other Sock Summit choices, I decided I could skip the class and buy some patterns.

All the patterns I've seen are cuff-down, and the theory is pretty straightforward: shape the fabric around the foot by increasing at fixed points on the bottom of the sock while simultaneously working decreases that travel up the sides and meet at the top. Flipping this around to to create a toe-up version is easy -- just work decreases at fixed points on the bottom, and increases that start at the top and travel down the sides.

I've been working on more detailed instructions in my lab, and while the work isn't finished, I think it may be at a point that I can start sharing it with my henchmen. Anyone up for a knit-along? If so, grab some sock yarn and needles, and we'll get started in a couple days.

Sunday, May 31, 2009

Antepenultimate Toe

Recent experiments in the Evil Genius lab have caused me to contemplate sock toes. My "Go To" toe remains the Just Start Knitting toe, but it's less than ideal in some situations.

I recently encountered the Knitting Swede's Rounded Toe. This is a great method; because the increases aren't stacked on top of one another, it eliminates the visible band, producing a smoother fabric. Because the increase rate is faster than usual -- 8 increases in 3 rounds instead of 4 -- the resulting toe is shorter than most. If you have short toes, you might prefer that.

I wanted something a little longer, so borrowing the Knitting Swede's method of offsetting the increases, I started working from an earlier experiment that produces a toe-up version of the Francie sock. This is the result:


While working on this, I knew it wouldn't be the "Ultimate Toe." I was thinking of it as the "Penultimate Toe," but I still think it falls somewhat short of the mark. Here, then, are the instructions for the...

ANTEPENULTIMATE SOCK TOE

Turkish Cast-on 8. Knit 1.5 rounds (16 sts total).

Begin toe increases:
  1. k1, yo, k6, yo, k1; repeat for top of sock (20 sts total)
  2. k1, ktbl, k1, yo, k4, yo, k1, k-twist*, k1; repeat (24 sts total)
  3. k1, yo, k2, ktbl, k4, k-twist, k2, yo, k1; repeat (28 sts total)
  4. k1, ktbl, k1, yo, k8, yo, k1, k-twist, k1; repeat (32 sts total)
  5. k3, ktbl, k8, k-twist, k3; repeat (32 sts total)
Begin alternate increase rows.
  1. k1, yo, k14, yo, k1; repeat for top of sock (36 sts)
  2. [and all even rounds] knit, twisting the yarnovers as established
  3. k3, yo, k12, yo, k3; repeat (40 sts)
  4. k5, yo, k10, yo, k5; repeat (44 sts)
  5. k7. yo, k8, yo, k7; repeat (48 sts)
  6. k9, yo, k6, yo, k9; repeat (52 sts)
  7. k11, yo, k4, yo, k11; repeat (56 sts)
  8. k13, yo, k2, yo, k13; repeat (60 sts)
I wasn't quite up to my desired circumference at this point, so I continued adding increases to the sides of the sock, as the Knitting Swede does.
  1. k1, yo, k28, yo, k1 (64 sts)
  2. k3, yo, k26, yo, k3 (68 sts)


* k-twist: Slip next stitch knitwise onto the right needle, changing its mount. Slip the stitch back to the left needle purlwise; the front leg of the stitch now lies in back of the needle while the back leg of the stitch comes down the front of the needle. Knit the back leg like it's a normal stitch, which further twists it to the right.

Saturday, May 30, 2009

Kindling

I like ebooks. I was so blown-away by CLEVNET's pioneering work into this field, I helped get them an award for their innovation. It was revolutionary: sitting in my office 140 miles from Cleveland hours before the library opened, I could check out a book and download it to my PocketPC.

It was a joy to read books on my first PocketPC, the HP Jornada. When held in the palm of my right hand, it had a little rocker switch just below my middle finger which activated the page turn.

I did have some problems. There was a learning curve to set up all the necessary programs and get the content and digital license transferred to my device. And once on a trip when I changed timezones on my PDA, I was locked out of my book, even after I changed the time back.

My next PocketPC wasn't as ebook-friendly. The Compaq iPaq didn't have the nicely placed rocker switch, and my hand would cramp trying to hold the device so that my thumb could operate the little pad that changed pages. New formats were coming out, sparking more technical issues with installations and updates. It seemed like every time I checked out an ebook, I was starting from scratch, as if it were my first time. (This, by the way, is what I was referring to in a Columbus Dispatch story about ebooks -- the reporter quotes me saying "digital-content arms race," when what I said was "digital rights management arms race.")

Since then, most of my ebook battles have been with digital audiobooks. I long ago reached the conclusion that it is significantly easier to steal digital content than it is to borrow it legally, a fact that will always make it nearly impossible for public libraries to matter very much in the ebook world. And even though my library offers the de riguer access to an ebook collection, little of it works with my iPhone, and I end up using iTunes or the iPhone's Kindle App.

A month ago, I came home from a long, late day at work to discover an Amazon Kindle on pillow. The sweetest man in the world bought it for me with his income tax refund. I plugged it in, entered my Amazon i.d., and in seconds the book I was reading on my iPhone was synced to the Kindle (it even got me directly to the last page I'd been reading).

What do I think of it? I pretty much agree with everything Charles McGrath said in the NY Times this week. I love it, but it has some flaws. My three favorite things about the Kindle?
  1. I can buy a book (or just download a sample) at 10:30 p.m. when I'm settling into bed to read before sleeping.
  2. I can prop the Kindle on a cushion and read while knitting, turning pages with the push of a button.
  3. The Kindle, as others have pointed out, is the Hitchhiker's Guide to the Galaxy.

Wednesday, May 27, 2009

You just can't call it a bus

I'm having a hard time getting worked up over the California Supreme Court upholding Prop 8. I try to be sympathetic: there is a rejection here, a refusal to recognize the legitimacy of our love. But the whole "separate but equal" posturing just doesn't cut it with me.

The NY Times cites Loyola law professor Karl M. Manheim's argument that, by claiming the word "marriage" is only symbolic, the decision "is like telling black people that sitting in the back of the bus is not important as long as the front and the back of the bus arrive at the same time." No, it's like telling black people that they can sit anywhere on the large, motor vehicle public transport system; they just can't call it a bus.

May I remind my brothers and sisters in California that in Ohio we are not allowed on this metaphorical public transport at all. Not just buses, but anything that approximates "the design, qualities, significance or effect of" buses is barred to us. The long game must be to make sure that anyone can ride. And when that happens, people will tire of saying "large, motor vehicle public transportation system" and call it "bus" for simplicity.

I don't mean to minimize the blow to those for whom the "M" word means something beyond the sets of legal rights, but maybe those rights are more important than what we call them? Marriage schmarriage: let Mike make medical decisions for me and inherit my stuff.

Sunday, May 03, 2009

Sock Genius Fail

If I don't shape up, I'm going to be forced to relinquish my claim as the Evil Sock Genius. I keep knitting beautiful socks that don't fit human feet.

EXHIBIT A: These socks were to be a Mother's Day present. I called them "Enelram," a toe-up adaptation of Cookie A's Marlene socks. They seemed fantastic until I finished the first one and discovered that it was an inch too long in the foot -- or would be, if you could pull the tight thing on in the first place.


EXHIBIT B: Figuring the problem was with my heel strategy, I decided to suck it up and follow the pattern. It made no difference. Only with much tugging and swearing could these socks be pulled on.

The problem, of course, is gauge. The pattern clearly specifies 24 stitches to 4 inches. (I would argue, however, that "6 stitches per inch" is more clear). I didn't notice that these socks need thicker yarn and bigger needles than usual. In my defense, a 68-72 stitch circumference normally indicates the yarn and needles I was using.

EXHIBITS C-F: These are prototypes for a pattern I'm working on (more about this later). I have ripped back and reknit the heels repeatedly, trying 4 different heel strategies. During this process, I had to admit that my numbers for the Evil Genius Sock are just wrong. Maybe they work on a plain stockinette sock, but like Exhibit A above, with a patterned instep they produce a sock that is both too long and too tight across the arch and heel. The 4th attempt finally produced something acceptable, but even that falls short of perfect.

The Evil Sock Genius pattern will have to undergo some serious revision. But first, I need to figure out what I'm going to do for Mother's Day.

Sunday, April 19, 2009

Again and again

I can't stop knitting these bears.

Sunday, April 05, 2009

It bears repeating: I hate to sew

This probably falls into the category of "crappy, homemade gift" rather than "lovely, hand-crafted gift." But as soon as I saw this pattern, I knew I had to make one.


Fun to knit up; hateful to sew. I had particular trouble around the head, so his face came out squashy and oddly crunched on one side. But by putting his face on crooked (embroidery = more stupid sewing) I managed to make him look like his head is cocked sideways in a curious attitude.

The designer put out a somewhat simpler pattern for a smaller version, and I might try that. It lacks the silly toes, and maybe the head will come out a better shape.