If you or your loved ones are not fortunate enough to have medium-sized men's feet, you can now rejoice, because Mastermind Sizing Variations are now available.
Please let me know if you discover errors in the expanded pattern.
Showing posts with label Socks. Show all posts
Showing posts with label Socks. Show all posts
Saturday, March 26, 2011

Saturday, March 12, 2011
Presenting "Mastermind"
All of these changes in the way I make toes, gussets, and heels add up to a new basic sock pattern. I call it Mastermind.
 Mastermind walks you through making a medium-sized men's sock. I'm working on padding out the pattern so that you can make larger and smaller socks, but I'm struggling to make those instructions clear and uncluttered. (It's the heel turn; doing that is complicated enough without having to make it work for 5 different sizes).
Anyway, thanks for reading along. I hope you give "Mastermind" a try. Let me know if you run into problems.
 Mastermind walks you through making a medium-sized men's sock. I'm working on padding out the pattern so that you can make larger and smaller socks, but I'm struggling to make those instructions clear and uncluttered. (It's the heel turn; doing that is complicated enough without having to make it work for 5 different sizes).
Anyway, thanks for reading along. I hope you give "Mastermind" a try. Let me know if you run into problems.
Sunday, March 06, 2011
Evil Genius Evolves: The Heel
What makes the Evil Genius pattern "mine?"
The general plan came from Widdershins, the toe from Queen Kahuna, the gussets from New Pathways, and the overall fit from Stitch Stud. I just put it all together and stirred in a bit of personality. But I also added stitch markers in the middle of the heel, marking the place in your short rows where you stop, make one, knit one, then wrap and turn. That's it. That's my only real claim to "genius."
And I'm about to throw it away for something better. And easier.
It's the wraps. Everyone hates them, but they seem to be a necessary evil: something needs to be done to close the holes left by the short rows. And then it hit me: what if I used the make one to close the gap?
It's so simple! Instead of adding stitches near the end of each short row, just work short rows and skip the wrapping. In your transition round, where you normally work the wraps together with the wrapped stitch, just pick up a new stitch in the gap.
Before and after shots:


The first time I tried it, I couldn't believe it. It was beautiful, smooth, easy, and nearly flawless. I say "nearly" because, as you can see in the picture above right (embiggen), a little hole tends to form at the right-side edge of the heel. It's not unexpected -- a similar hole is a hazard in every sock pattern I've ever encountered -- but I've yet to find an elegant, non-fussy method for avoiding or eliminating it. Any suggestions?
Shoulders of Giants
In my previous post on gussets, I mentioned the role Ted Myatt played in getting me to think about gusset placement and fit. I have to credit Stephen Houghton for pointing me in that direction (as well as so many other fruitful directions). This latest epiphany about the heel was inspired by Tallguy. He patiently explained his ideas to me in email, but it took me nearly 4 years to really get it. Thanks, guys, you are the real geniuses; I'm just an appreciative fan.
The general plan came from Widdershins, the toe from Queen Kahuna, the gussets from New Pathways, and the overall fit from Stitch Stud. I just put it all together and stirred in a bit of personality. But I also added stitch markers in the middle of the heel, marking the place in your short rows where you stop, make one, knit one, then wrap and turn. That's it. That's my only real claim to "genius."
And I'm about to throw it away for something better. And easier.
It's the wraps. Everyone hates them, but they seem to be a necessary evil: something needs to be done to close the holes left by the short rows. And then it hit me: what if I used the make one to close the gap?
It's so simple! Instead of adding stitches near the end of each short row, just work short rows and skip the wrapping. In your transition round, where you normally work the wraps together with the wrapped stitch, just pick up a new stitch in the gap.
Before and after shots:


The first time I tried it, I couldn't believe it. It was beautiful, smooth, easy, and nearly flawless. I say "nearly" because, as you can see in the picture above right (embiggen), a little hole tends to form at the right-side edge of the heel. It's not unexpected -- a similar hole is a hazard in every sock pattern I've ever encountered -- but I've yet to find an elegant, non-fussy method for avoiding or eliminating it. Any suggestions?
Shoulders of Giants
In my previous post on gussets, I mentioned the role Ted Myatt played in getting me to think about gusset placement and fit. I have to credit Stephen Houghton for pointing me in that direction (as well as so many other fruitful directions). This latest epiphany about the heel was inspired by Tallguy. He patiently explained his ideas to me in email, but it took me nearly 4 years to really get it. Thanks, guys, you are the real geniuses; I'm just an appreciative fan.
Thursday, March 03, 2011
Evil Genius Evolves: Gussets
The challenge to toe-up socks is figuring out where to start expanding for the gussets. I used to think the answer was to count rows, and I remain a die-hard row counter -- it's how you make one sock the same size as the other. Still, I get how lots of math turns people off. And that's how I came up with my new lab assistant, Gus.
Gus first made his appearance in the Evil Genius lab during the Arch-Villain project. Rather than issuing complicated instructions to calculate how many rounds long your sock should be and then subtract the gusset and heel rounds, I said:
Gus, it turns out, can help me solve a persistent problem: frequently, my socks are a wee bit too long. So if I give Gus some elbow room, round him up by ¼-½ inch, that removes the extra length.
 The great Cat Bordhi discovered that gusset increases, when worked 2 increases per 3 rows, could be placed anywhere around the sock. The standard Evil Genius pattern puts them in a fairly conventional line up along the instep, but Ted Myatt argues convincingly that they should be moved away from there. I've grown fond of placing them along the sole, at the width of the heel base, because that provides a nice set up when it comes time to turn the heel.
Gus first made his appearance in the Evil Genius lab during the Arch-Villain project. Rather than issuing complicated instructions to calculate how many rounds long your sock should be and then subtract the gusset and heel rounds, I said:
When your sock is about 4 inches long, measure the distance of 26 rows (or rounds). It's probably between 2 - 2.5 inches. This is your gusset length -- let's call it "Gus." Continue working until your sock is "Gus" inches shorter than the total length of the foot.Simple. Direct. Effective. And whimsical enough to be non-threatening. I've thought for some time that Gus could be put to more frequent use around the lab, particularly since I can specify whatever I want for the distance. For my own socks, Gus is usually 51 rows, or around 4 inches.
Gus, it turns out, can help me solve a persistent problem: frequently, my socks are a wee bit too long. So if I give Gus some elbow room, round him up by ¼-½ inch, that removes the extra length.
 The great Cat Bordhi discovered that gusset increases, when worked 2 increases per 3 rows, could be placed anywhere around the sock. The standard Evil Genius pattern puts them in a fairly conventional line up along the instep, but Ted Myatt argues convincingly that they should be moved away from there. I've grown fond of placing them along the sole, at the width of the heel base, because that provides a nice set up when it comes time to turn the heel.
Tuesday, March 01, 2011
Evil Genius Evolves: The Toe
 Changes are afoot in the lab. I've been conducting some sock-knitting experiments lately, and they're producing some very pleasing results. To begin, I've settled on a new standard pattern for my toes. It's very round at the beginning, increases rapidly but smoothly at the start, then transitions into more gradual increases for a slightly longer toe and (in my opinion) a better fit.
With desirable, fingering weight sock yarn and a 32 inch, size 1.5 (2.5mm) circular needle:
- Cast on 14 stitches using Turkish cast-on and knit 1.5 rounds. (If you prefer Judy's Magic Cast-On, cast on 14 stitches on each needle and knit 1 round).
I use a couple different increase methods in my toe because they produce subtly different effects. For the first increase round, I use KLL and KRL, or what Cat Bordhi calls LLinc (La-Link) and LRinc (La-Rink). This increase pulls the stitches together, reducing the tendency for increases to create corners at the tip.
- Knit 1, KRL, knit until 1 st remains on the sole, KLL, knit 1. Repeat for instep.
k-twist: Slip next stitch knitwise onto the right needle, changing its mount. Slip the stitch back to the left needle purlwise; the front leg of the stitch now lies in back of the needle while the back leg of the stitch comes down the front of the needle. Knit the back leg like it's a normal stitch, which further twists it to the right.
- Knit 2, YO, knit until 2 sts remain on the sole, YO, knit 2. Repeat for instep.
- Knit 2, k1tbl, knit until 3 sts remain on the sole, k-twist, knit 2. Repeat for instep.
- Knit 2, YO, knit until 2 sts remain on the sole, YO, knit 2. Repeat for instep.
- Knit round, twisting the yarnovers as established.
- Knit round plain.
More notes:
My old Just Start Knitting toe never quite worked for me. It tended to twist on my toes, and sometimes I could feel a ridge created by the round of doubled stitches. Also, it just didn't look as good; I prefer stitches smoothly flowing from instep to sole over the tip of the toe. Anatomically correct toes helped with the twist, but I dislike checking whether my socks are on the right feet.
I'm most pleased with the effect of doing the first increase 1 stitch in from the edge, then moving subsequent increases another stitch in. It makes a smooth transition from the cast-edge into the increase lines.
I've been using these toes exclusively since I put all this together last summer. I hope you like it.
Sunday, June 20, 2010
Genius Footprint -- Mark the Leg

Using science (that is, gauge and actual measurements of your foot), we've knit to our measurements and should be near the center of the ankle when we've completed the gusset increases. If you want, you can check this using the method Bordhi outlines in Personal Footprints: draw a line down the middle of your leg, try on your sock, and see if it reaches. You might need to add a few rows to make up for foot expansion. Now it's time to mark where your leg will be.
(You might have figured out that the point of this series was to explore whether I could successfully make socks like those in Personal Footprints for Insouciant Sock Knitters, but without everything I dislike about those socks: the round toe, the "footprint" that doesn't adapt well to different gauges, and especially the annoying trial-and-error process. But the steps that deal with opening up the leg are the parts that I really, really like about the book.)
Sock patterns are usually written with the assumption that people's ankles are about the same circumference as the ball of their foot. For most of my family, it's pretty close, but here is where you can customize. The base of my ankle is just a bit bigger around than the base of my foot, so I'm going to plan for 72 stitches in circumference rather than the 68 stitches I had at the ball.
So what I do now is run a lifeline through the stitches where I will later put the leg of the sock. If my ankle will be 72 stitches, then I need to run a lifeline through 36 stitches, centered on the top. Following Bordhi's instructions, I knit another round, marking a stitch that I will later cut and unravel for the leg opening. Then I knit the next round and run another lifeline through the 36 stitches above my first life line.

I experimented with a more familiar method -- knitting my leg stitches with a bit of waste yarn, which I later removed to knit the leg -- but the end result isn't as nice. And in this instance, I recommend following Bordhi's instructions exactly. If you can't get your hands on a copy of Personal Footprints, you can get the general idea from the Houdini Sock pattern and from Bordhi's YouTube videos.
Tuesday, June 15, 2010
Genius Footprint -- The Gusset Increases
In New Pathways for Sock Knitters, Cat Bordhi demonstrated that gusset increases can be located anywhere you want on the sock -- top, bottom, sides; neatly stacked on top of each other or randomly spaced. Where do they work best on your foot? I'm still experimenting, but I think my increases work better on the top...

...or the sides.

My theory is that if the increases follow the lines where my foot gets bigger, then the stitches won't be distorted by the changing shape of my foot -- they'll flow in more or less straight lines from the toe to the heel.

Sunday, June 13, 2010
Genius Footprint -- The Plan
The Genius Footprint is based on measurements and gauge. The toe is your gauge swatch; now you need these key measurements:
 Circumference around the ball of the foot
- Circumference at the widest part of the foot: around the heel and instep (see picture at right for illustration)
- Length of foot (Best way: put a ruler on the floor, extending out from a wall; stand on the ruler, back of the heel pressed against the wall)
- Length from the tip of the longest toe to the center of the ankle (see this blog post for advice).
We've already calculated how the sock will fit around the ball of the foot: gauge x circumference x 88% for negative ease. Now calculate how many stitches the sock will need to be at its widest. My foot is 9 inches at the ball, 13 at the heel/instep, or 68 stitches at the ball and 98 at the widest point. I will need to increase 30 stitches over the gusset section.
Gusset sections begin about halfway along the foot. My foot is 10 inches long, so I will start my gussets when the sock is about 5 inches. I can safely continue knitting for a few inches, give myself some more fabric so I can accurately check row gauge. My sock is 13 rows (or rounds) per inch, so I'll want to start my gussets near round 65.
The increases need to be completed before the center of the ankle. For me, that's at 7.5 inches, or round 98. Isn't that handy? I'll need to make 30 gusset increases, and I've got just over 30 rows to do it.
I can knit plain up to row 68, and ponder what I want to do with the gusset section.
Saturday, June 12, 2010
Genius Footprint -- The Toe
The Genius Footprint begins with an anatomically correct toe.

[Gauge = 8.5 stitches per inch]
Turkish Cast-On
- Hold your circular needle so that both ends are together, pointed to the right.
- Pull the bottom needle to the right, so your top needle is held together with the bottom cord.
- Start your yarn in back of the needles, leaving a 12" tail hanging.
- Wrap the yarn over toward you, down across the front and up the back of the needles.
- Wrap until you have 7 loops.
Rounded Toe
- Knit across the stitches on the "top" needle. Be sure to keep your stitches snug on the "bottom" needle.
- Hold working yarn and tail together, and work 1 round. (This doubles the number of loops on each side -- 14 per side, 28 total.)
- Drop the tail, and knit one round, working one stitch in each loop.
Begin to think of the first 14 stitches as the sole (bottom) of the foot, and the other 14 stitches as the instep (top).
Toe Increases
- Knit 2, YO, knit until 2 stitches remain of sole stitches, YO, knit 2. Repeat for the instep.
- Knit round, working the first yarnover on each side through the back loop, and the second yarnover as k-twist*.
Repeat these two rounds until you have 48 stitches, 24 stitches per side (or until your sock is about an inch long). Then continue knitting but stop increasing on one of the ends. For example:
Left Foot
- Knit until 2 stitches remain of sole stitches, YO, knit 2. On instep side, knit 2, YO, knit to end of round.
- Knit round, working the yarnover at the end of the sole stitches as k-twist, and the yarnover at the beginning of the instep stitches through the back loop.
Right Foot
- Knit 2, YO, knit to end of sole stitches. On instep, knit until 2 stitches remain, YO, knit 2.
- Knit round, working the yarnover at the beginning of the round through the back loop, and the yarnover at the end of the round as k-twist.
Repeat until your sock is desired circumference. For me, that's 68 stitches. For you, it's gauge x circumference around ball of foot x negative ease. (8.5 spi x 9 inch ball x 88% negative ease = 67.32, or 68 stitches).
* k-twist: Slip next stitch knitwise onto the right needle, changing its mount. Slip the stitch back to the left needle purlwise; the front leg of the stitch now lies in back of the needle while the back leg of the stitch comes down the front of the needle. Knit the back leg like it's a normal stitch, which further twists it to the right.
Saturday, January 06, 2007
Deadlines met
Yesterday was my last day at work. I'm uninsured for a week, and then I start at the new job.
As I mentioned before, my only serious Christmas knitting was for the people I worked with, but two projects were unfinished. I got them finished in time for my last day.
First, the socks made from Mountain Colors merino:
 And second, the fingerless mittens, which Karl calls "programmers mittens."
 Made from "Tundra" by Katia, half wool, half acrylic and rayon. These are kind of a mash-up, mostly inspired by Michael's "Medallion Mitts" but constructed using instructions from Pop Up Paws (although I'd think any mitten pattern with a thumb gusset would do). I think the wrists aren't long enough and the ribbing is off-center (see the close-up picture), but Karl likes them. So let's think of them as pre-release beta tests.
As I mentioned before, my only serious Christmas knitting was for the people I worked with, but two projects were unfinished. I got them finished in time for my last day.
First, the socks made from Mountain Colors merino:
 And second, the fingerless mittens, which Karl calls "programmers mittens."
 Made from "Tundra" by Katia, half wool, half acrylic and rayon. These are kind of a mash-up, mostly inspired by Michael's "Medallion Mitts" but constructed using instructions from Pop Up Paws (although I'd think any mitten pattern with a thumb gusset would do). I think the wrists aren't long enough and the ribbing is off-center (see the close-up picture), but Karl likes them. So let's think of them as pre-release beta tests.
Tuesday, August 29, 2006
The Stash Fairy
She signs her emails "lc2" and those who follow her blog (and you should: it's poetic, smart, spirited, and different, a glimpse into how one goes about surviving cancer) may know her as "rcclive," but I think I'm going to start calling her the Stash Fairy.
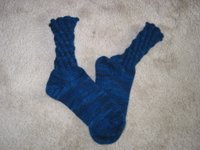 With the gift of a single skein of Bearfoot back in May 2004, she reawakened my dormant sock knitting (which now occupies so much of this blog). The gift sent me to The Stitch Stops Here in search of more of this marvelous stuff, and ensured that my generally stash-free existence was at an end, not to mention all the money I've blown on Addi Turbos.
I had lunch with her Friday, when she layered upon me several marvelous gifts: 10 balls of blue baby cashmere, some purple cotton Sockotta (mom will be happy), Trekking XXL, Trekking Tweed, and Trekking Color. She threw in a sock pattern with an interesting cabled/broken rib design, and a blue t-shirt that says "I just came in to pet the yarn." All of this in a canvas DRA Taos bag, which for a library automation geek like me is perhaps the coolest part of the gift. I want lunch with her to be a regular thing, as long as she promises to stop bringing me stuff (bad fairy!) and takes naps before starting for home. I was horrified to read how much our lunch had tired her out.
Oh, the picture? It's that first skein of Bearfoot, the first pair of socks I made two-at-once on two circs (toe-up, naturally). The cuff design is from Stash Fairy's own sock pattern, called "Twirly Toes."
 With the gift of a single skein of Bearfoot back in May 2004, she reawakened my dormant sock knitting (which now occupies so much of this blog). The gift sent me to The Stitch Stops Here in search of more of this marvelous stuff, and ensured that my generally stash-free existence was at an end, not to mention all the money I've blown on Addi Turbos.
I had lunch with her Friday, when she layered upon me several marvelous gifts: 10 balls of blue baby cashmere, some purple cotton Sockotta (mom will be happy), Trekking XXL, Trekking Tweed, and Trekking Color. She threw in a sock pattern with an interesting cabled/broken rib design, and a blue t-shirt that says "I just came in to pet the yarn." All of this in a canvas DRA Taos bag, which for a library automation geek like me is perhaps the coolest part of the gift. I want lunch with her to be a regular thing, as long as she promises to stop bringing me stuff (bad fairy!) and takes naps before starting for home. I was horrified to read how much our lunch had tired her out.
Oh, the picture? It's that first skein of Bearfoot, the first pair of socks I made two-at-once on two circs (toe-up, naturally). The cuff design is from Stash Fairy's own sock pattern, called "Twirly Toes."
Subscribe to:
Posts (Atom)